You Won’t Believe These 13 Wall Painting Hacks for Maximum Impact With Minimal Effort!
Dreaming of a home makeover that breathes new life into your space but shudder at the thought of endless hours, complex techniques, and a mountain of effort? What if you could achieve a stunning, high-impact transformation with surprisingly minimal fuss? Get ready to be amazed, because we’ve unlocked 13 wall painting hacks that are all about achieving maximum visual punch with the least amount of strain on your time, budget, and energy.
Forget the notion that a dramatic room refresh requires a complete overhaul or professional intervention. These clever tips and tricks are designed for savvy homeowners and aspiring DIYers who want to work smarter, not harder. From strategic color choices to ingenious application techniques, you’re about to discover how simple, targeted changes can yield incredibly powerful results. Say goodbye to painting procrastination and hello to a vibrant, revitalized home that looks like a million bucks, without the million-dollar effort!
The Power of Smart Painting – Why Minimal Effort Can Still Mean Maximum Wow
Before we dive into these transformative hacks, let’s appreciate why a “minimal effort, maximum impact” approach is so appealing. In our busy lives, time is a precious commodity. We want our homes to be beautiful and reflect our personalities, but we don’t always have weeks to dedicate to a single project. Furthermore, budget considerations are always key. These hacks prove that you don’t need to break the bank or exhaust yourself to create a space that feels fresh, modern, and utterly impressive. They’re about making strategic choices that deliver the biggest bang for your buck and your time. Get ready to paint your way to a more beautiful home, the easy way!
The 13 Wall Painting Hacks to Revolutionize Your Space (Effortlessly!)
Prepare to be inspired. These aren’t your average painting tips; these are your secret weapons for a stunning home transformation:
1. The Mighty Accent Wall: One Wall, Infinite Impact (Low Effort, High Drama)
The Problem: Painting an entire room can be a significant time commitment and feel overwhelming. You want a change, but you’re not ready for a full four-wall project.
The Hack: Choose one strategic wall to be your “accent” or “feature” wall. Paint this single wall in a bold, contrasting color, a deeper shade of your existing wall color, or even apply a simple pattern or texture (we’ll get to more on that later!).
- Placement is Key: Ideal accent walls are typically those that your eyes are naturally drawn to when you enter a room – often the wall behind a bed, a sofa, a fireplace, or a wall with architectural interest.
- Color Choice: Don’t be afraid to go bold! Deep blues, rich greens, vibrant terracottas, or even a sophisticated charcoal can create instant drama and depth. Alternatively, a subtle shift to a darker hue of your current color can add elegance without being jarring.
Why it Delivers Maximum Impact with Minimal Effort:
- Time Saver: You’re only prepping, priming (if needed), and painting one-fourth of the usual surface area. This drastically reduces painting time.
- Cost-Effective: Less wall space means you’ll need significantly less paint, saving you money.
- Instant Focal Point: An accent wall immediately draws the eye, creating a dynamic focal point and adding personality to the room without overwhelming it.
- Easy to Update: When you’re ready for another change, repainting a single accent wall is a much quicker and less daunting task than redoing the entire room.
Pro-Tip: Consider the existing colors in your furniture, rugs, and decor when choosing your accent color to ensure a cohesive look. Even a small sample pot of your chosen bold color can be tested on a piece of cardboard and held against the wall to visualize the effect.
2. The “Paint the Fifth Wall” Surprise: Look Up for Unexpected Elegance (Moderate Effort, Sky-High Impact)
The Problem: Ceilings are often overlooked, typically painted a standard flat white out of habit. This is a missed opportunity for adding character and making a room feel truly unique.
The Hack: Treat your ceiling as the “fifth wall” and give it a color treatment.
- Subtle Sophistication: Painting the ceiling a very pale shade of your wall color, or a color a few shades lighter, can create a soft, cohesive feel and make the room appear slightly larger.
- Dramatic Flair: For a bold statement, especially in rooms with high ceilings, consider a darker color for the ceiling (charcoal, navy, or even black). This can make a large room feel cozier and more intimate, and add a serious dose of drama.
- Hint of Color: A pale blue can mimic the sky, while a soft warm tone can add coziness.
- Metallic Sheen: For a touch of glamour in a dining room or master bedroom, a metallic paint or a high-gloss finish in a subtle color can reflect light beautifully.
Why it Delivers Maximum Impact with Minimal Effort:
- Unexpected Element: It’s a departure from the norm and instantly adds a custom, designer touch to the room.
- Alters Perception of Space: Light ceiling colors can make a room feel airier, while dark colors can add intimacy or highlight crown molding.
- Relatively Contained Area: While painting a ceiling requires some neck craning, it’s still a defined space that, once prepped, can be painted relatively quickly compared to intricate wall designs.
Pro-Tip: Ensure your ceiling is in good condition, as color (especially glossier finishes) can highlight imperfections. Always use a good quality roller with an extension pole and wear eye protection!
3. The Two-Tone / Half-Painted Wall: Modern, Chic, and Effortlessly Cool (Moderate Effort, Trendsetting Impact)
The Problem: You want a contemporary look that’s more interesting than a single solid color, but intricate patterns or wallpaper feel too complex or permanent.
The Hack: Embrace the two-tone or half-painted wall trend. This involves painting the bottom portion of your wall one color and the top portion another, or leaving the top portion the existing color (often white or a neutral).
- Classic Chair Rail Effect (Without the Rail): Traditionally, the darker color goes on the bottom. This can ground the room and add a sense of stability.
- Modern Inversion: For a more contemporary or playful look, consider a lighter color on the bottom and a darker or bolder color on top.
- Uneven Split: You don’t have to divide the wall exactly in half. A common approach is to paint the bottom third or two-thirds. Experiment with proportions to see what best suits your room and furniture height.
- Crisp Line is Key: The success of this hack lies in achieving a perfectly straight, crisp line between the two colors. Use high-quality painter’s tape (see Hack #1 for cleaner edges in the previous blog post idea, or simply focus on thorough taping and sealing here). A laser level can be invaluable for marking your line around the room.
Why it Delivers Maximum Impact with Minimal Effort:
- Visually Interesting: It adds architectural interest even in a plain room and creates a strong graphic element.
- Customizable Height: You can adjust the line to visually alter the room’s proportions – a higher line can make the ceiling feel lower and cozier, while a lower line can make it feel taller.
- Less Paint & Time (Potentially): If you leave the top portion white (especially if it’s already white and in good condition), you’re only painting part of the wall.
Pro-Tip: To ensure an ultra-crisp line, after applying your painter’s tape, paint along the edge of the tape with the base color (the color already on the wall or the first color you applied). Let it dry. Any bleed will be in the base color. Then, paint your second color. When you remove the tape (while the second color is still slightly tacky), the line will be perfect.
4. The “Frame It Out” Door & Window Trim Pop: Detail-Oriented Impact (Low Effort, High Character)
The Problem: Doors, window frames, and even baseboards are often painted a standard white or cream, blending into the background.
The Hack: Give your interior doors and/or window trims a bold or contrasting color treatment.
- Dramatic Doors: Painting an interior door (or just the inside of your front door) a striking color like black, deep navy, sunny yellow, or even a vibrant coral can turn it into an architectural feature.
- Defined Windows: Painting window frames in a contrasting color (e.g., black frames against light walls, or dark gray frames against white walls) can frame the view like a piece of art and add a sophisticated, modern touch.
- Subtle Contrast: Even shifting from standard white to a soft gray or a greige for trim can add depth and a more curated feel.
Why it Delivers Maximum Impact with Minimal Effort:
- Highlights Architecture: Draws attention to the architectural details of your home.
- Small Surface Area: Doors and trims are relatively small surface areas compared to walls, meaning less paint and less painting time, though they require careful cutting-in or taping.
- Unexpected Pop: It’s a relatively simple change that adds a surprising amount of personality and designer flair.
Pro-Tip: Use a durable, semi-gloss or satin paint finish for doors and trim as these areas tend to see more wear and tear and are easier to clean than flat finishes. Good quality angled sash brushes are your best friend for this task.
5. The “Just the Inside” Bookshelf or Cabinetry Surprise: Hidden Color Pop (Low Effort, Delightful Impact)
The Problem: Open shelving, glass-front cabinets, or built-in bookcases can sometimes look a bit bland or cluttered.
The Hack: Paint the inside back panel of your bookshelves, display niches, or glass-front cabinets a contrasting color or even a subtle pattern.
- Color Coordination: Choose a color that complements your room’s decor or the items you plan to display.
- Wallpaper Remnants: Small pieces of leftover wallpaper can also be used for a patterned effect with even less painting.
- Depth Illusion: A darker color can make the shelves appear deeper, while a bright color can make your displayed items pop.
Why it Delivers Maximum Impact with Minimal Effort:
- Tiny Area, Big Difference: You’re painting a very small, contained surface, so it’s incredibly quick and uses minimal paint.
- Highlights Decor: Provides a vibrant backdrop that makes books, vases, and other decorative items stand out.
- Reversible & Low Risk: If you tire of the color, it’s very easy to repaint just that small back panel.
Pro-Tip: Empty the shelves completely and clean them thoroughly before painting. A small roller or brush will work perfectly. Consider a satin or eggshell finish for durability.
6. The Power of High-Quality “Paint and Primer in One”: Fewer Coats, Faster Finish (Effort & Time Saver)
The Problem: Priming and then applying multiple coats of paint can be time-consuming and laborious, especially if you’re impatient to see results.
The Hack: For many situations (like painting over a similar or lighter color in good condition), invest in a high-quality “paint and primer in one” product.
- Read the Label: Ensure the product is suitable for your specific surface and situation. While these are convenient, a dedicated primer is still often best for dramatic color changes, stained walls, or porous surfaces like new drywall.
- Brand Reputation: Opt for reputable brands known for good coverage and durability.
Why it Delivers Maximum Impact with Minimal Effort:
- Reduces Coats: These paints are formulated for better coverage, often allowing you to achieve your desired finish in fewer coats compared to using separate, lower-quality products. This means less painting time and effort.
- Improved Adhesion & Durability: Good quality all-in-one paints often offer excellent adhesion and a more durable finish.
- Simplified Process: One less step in the painting process can make a big difference to your overall effort.
Pro-Tip: Even with a paint-and-primer combo, ensure your walls are properly cleaned and prepped. No paint can perform miracles on a dirty or damaged surface.
7. The “Roller Texture” Subtlety: Adding Dimension Without the Fuss (Low Effort, Tactile Impact)
The Problem: Flat painted walls can sometimes feel a bit one-dimensional. You want texture, but faux finishes like Venetian plaster or rag rolling seem too complicated or dated.
The Hack: Use specialty paint rollers designed to create subtle textures, or simply embrace the natural texture (stipple) created by a standard nap roller.
- Textured Rollers: Hardware stores sell rollers with built-in patterns (like linen, denim, or stucco effects). These are rolled on over a base coat, often with a slightly different color or a glaze, to create an all-over subtle pattern.
- Embrace the Stipple: Instead of trying to achieve a perfectly flat finish (which can be difficult for beginners), a consistent stipple from a 3/8″ or 1/2″ nap roller can itself add a pleasing, subtle texture. Focus on even application.
- Sponge Rollers: These can create a mottled or softly textured effect with minimal skill required.
Why it Delivers Maximum Impact with Minimal Effort:
- Easy Application: Using a textured roller is often as simple as regular rolling.
- Adds Depth & Interest: Even a slight texture can catch the light in interesting ways, adding dimension and warmth to the walls.
- Hides Minor Imperfections: A textured finish can be more forgiving of minor wall flaws than a perfectly smooth, flat finish.
Pro-Tip: Practice with textured rollers on a large piece of cardboard first to get a feel for the technique and the amount of paint to load. Ensure consistent pressure and overlap for an even pattern.
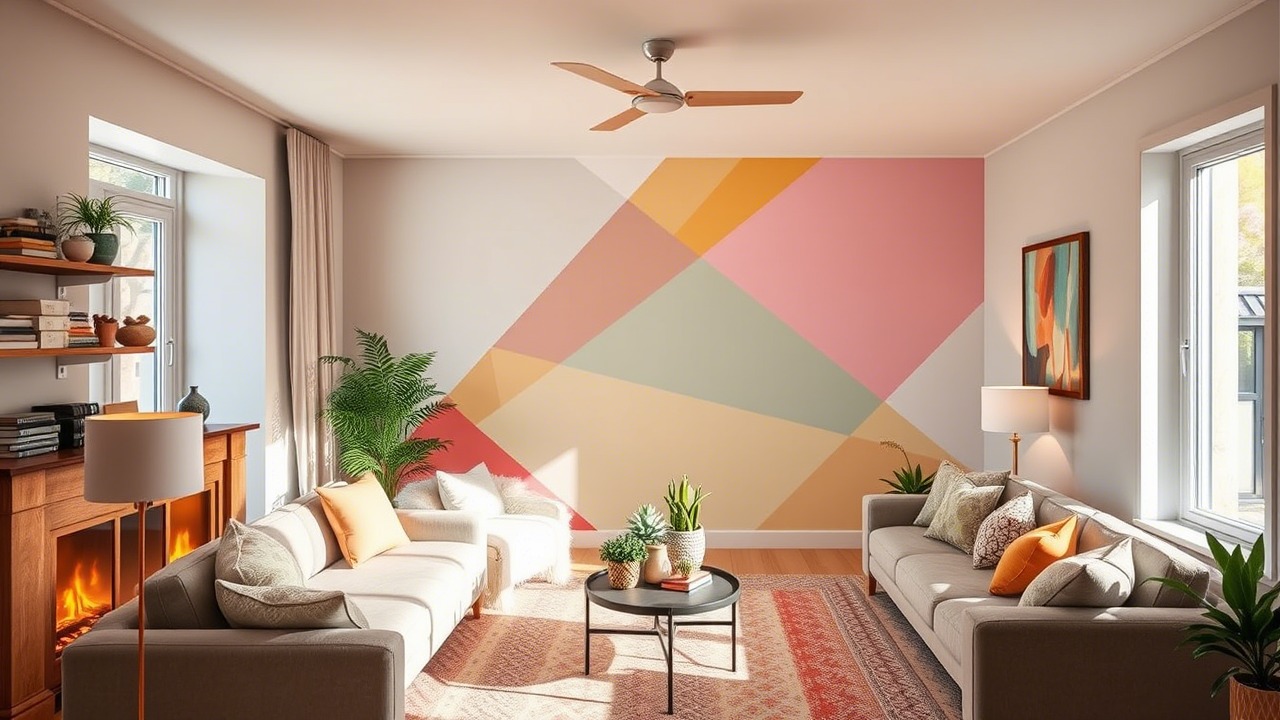
8. The Single Stripe or Color Block Statement: Graphic Punch with Precision (Moderate Effort, High Style Impact)
The Problem: You love bold, graphic designs but don’t want to commit to an entire wall of pattern.
The Hack: Paint a single, wide vertical or horizontal stripe, or a geometric color block, on a prominent wall.
- Vertical Stripe: Can create an illusion of height or define a specific zone, like behind a desk or a tall bookcase.
- Horizontal Stripe: Can make a room feel wider or act as a modern take on a chair rail.
- Color Block: A large painted rectangle or square behind a sofa or bed can act like a visual headboard or frame a gallery wall.
- Precision is Paramount: Like the half-painted wall, success here depends on perfectly straight lines achieved with high-quality painter’s tape and careful sealing techniques (see Hack #3). A laser level is your best friend for planning.
Why it Delivers Maximum Impact with Minimal Effort:
- Focused Design Element: It’s a deliberate, artistic statement that requires less paint and time than an all-over pattern.
- Modern & Customizable: Offers endless possibilities for color combinations and placement to suit your style.
- Defines Zones: Can cleverly delineate spaces within an open-plan area without physical barriers.
Pro-Tip: Plan your stripe or block carefully. Use a pencil and a long level or laser level to mark your lines. Take your time with the taping – it’s the most crucial part for this hack.
9. The “Refresh Instead of Repaint” Reviver: Clean & Touch-Up Magic (Ultra-Low Effort, Renewed Impact)
The Problem: Your walls are generally in good condition and you still like the color, but they look a bit tired, scuffed, or marked. A full repaint feels unnecessary.
The Hack: Sometimes, all your walls need is a thorough cleaning and some targeted touch-ups.
- Wash Your Walls: You’d be surprised how much brighter walls can look after a good cleaning. Use a mild solution of sugar soap or a gentle detergent and water. For tougher scuffs, a magic eraser can work wonders (test in an inconspicuous spot first).
- Strategic Touch-Ups: If you have leftover paint from the original job (and it’s still good – properly stored paint can last for years), use a small artist’s brush or a very small roller to carefully touch up any remaining scuffs, chips, or nail holes. Dab lightly to blend with the existing paint.
Why it Delivers Maximum Impact with Minimal Effort:
- Fastest “Makeover”: Cleaning and minor touch-ups can be done in a few hours and make a significant difference to the room’s freshness.
- Extremely Cost-Effective: Uses minimal supplies, potentially just cleaning agents and leftover paint.
- Preserves Your Original Investment: Avoids a full repaint if the color and overall condition are still good.
Pro-Tip: When touching up, try to feather the edges of the new paint into the old to make the repair less noticeable. The original sheen and application method (brush vs. roller) should be matched as closely as possible.
10. The “Paint an Arch or Organic Shape” Whimsy: Soft Curves, Big Personality (Moderate Effort, Unique Impact)
The Problem: You want a playful, artistic touch that’s softer than hard geometric lines.
The Hack: Paint a large archway shape on a wall to frame a piece of furniture, create a faux headboard, or define a nook. Or, go even more freeform with soft, organic “blobs” or curved color blocks.
- Arch Technique: To create a perfect arch, you can use the “string and pencil” compass method. Tie a string to a pencil, tack the other end of the string to the wall where the center of the arch’s base would be (or the center of the circle if you want a full circle top). Keep the string taut and draw your curve. Tape carefully along this line.
- Organic Shapes: Lightly sketch your desired organic shape with a pencil, then carefully paint inside the lines freehand with an artist’s brush or a small angled sash brush for the edges, filling in with a larger brush or roller.
Why it Delivers Maximum Impact with Minimal Effort:
- Artistic & Unique: Adds a bespoke, hand-painted feel to the room that is very on-trend.
- Defines Space Softly: Can create zones or focal points without harsh lines.
- Relatively Quick (Once Planned): While the planning and taping for an arch might take a bit of time, the actual painting area is often quite contained. Freehand organic shapes can be even quicker if you’re confident.
Pro-Tip: For arches, use flexible painter’s tape designed for curves if you can find it, or use short pieces of regular high-quality tape, slightly overlapping them to follow the curve. Stand back frequently to check the symmetry and proportions of your shape.
11. The “Use What You Have” Leftover Paint Medley: Creative & Sustainable (Varies Effort, Eco-Friendly Impact)
The Problem: You have several cans of leftover paint from previous projects in various colors and quantities, and you don’t want them to go to waste.
The Hack: Get creative with your leftovers!
- Small Accent Projects: Use them for Hack #5 (insides of bookshelves), or to paint a small piece of furniture, picture frames that coordinate with your new wall color, or even the edge of a door.
- Subtle Stripes or Blocks: If you have enough of two or three coordinating colors, you could create subtle stripes (Hack #8) or a small color-blocked design on a section of a wall.
- Ombre Effect (Advanced Minimal Effort): If you have a color and white, you could try a very simple ombre on a small scale by mixing progressively more white into your color for soft bands. This is more advanced but can be done with minimal paint.
Why it Delivers Maximum Impact with Minimal Effort:
- Cost-Free (Almost): You’re using materials you already own.
- Reduces Waste: An environmentally conscious way to refresh your space.
- Unique & Personal: The result will be entirely unique to your collection of leftover paints.
Pro-Tip: Make sure your leftover paints are still in good condition (not lumpy, smelly, or separated beyond remedy by stirring). Test them on a piece of cardboard first. Always stir thoroughly!
12. The “Light-Reflecting Sheen” Strategy: Brighten and Enlarge (Low Effort, Illuminating Impact)
The Problem: A room feels dark, cramped, or lacks natural light. You want to make it feel brighter and more spacious without major renovations.
The Hack: Choose paint sheens strategically to maximize light reflection.
- Satin or Eggshell on Walls: These finishes have a subtle luster that reflects more light than flat or matte finishes, making walls appear to recede slightly and brightening the room. They are also more durable and easier to clean than flat paints.
- Semi-Gloss on Trim: Using semi-gloss on window frames, door frames, and baseboards can help bounce light around the room and make these architectural details stand out cleanly.
- Strategic Gloss: While high-gloss on all walls can be unforgiving of imperfections, a touch of it on a very smooth accent piece or even a ceiling (Hack #2) in a light color can significantly boost light reflection.
Why it Delivers Maximum Impact with Minimal Effort:
- Passive Brightening: The paint itself does the work of reflecting light, requiring no extra effort beyond choosing the right sheen.
- Illusion of Space: Brighter, light-reflective surfaces can make a room feel larger and more open.
- Enhanced Durability: Higher sheens are generally more resistant to scuffs and easier to clean, meaning your impactful look lasts longer with less maintenance.
Pro-Tip: Remember that higher sheens will highlight any imperfections on the wall surface (bumps, dents, uneven patches). Ensure your walls are well-prepped and as smooth as possible if opting for satin or semi-gloss.
13. The “One Day Room Refresh” Focus: Concentrated Effort, Swift Transformation (High Focus, Fast Impact)
The Problem: The thought of a painting project dragging on for days or weeks is demotivating.
The Hack: Dedicate one full day (or a weekend) to transforming a single, small to medium-sized room using one or a combination of the simpler hacks above.
- Choose Wisely: A powder room, a small bedroom, an accent wall, or just painting trim and a door are achievable in a day.
- Plan Ahead: Gather all your supplies, prep the room (clean, tape, cover furniture) the day before if possible.
- Stay Focused: Minimize distractions and work efficiently.
- Instant Gratification: The quick turnaround provides a huge sense of accomplishment and immediate enjoyment of your refreshed space.
Why it Delivers Maximum Impact with Minimal Effort (Concentrated):
- Psychological Win: Completing a project quickly is highly motivating.
- Visible Results Fast: You see the fruits of your labor almost immediately, which spurs enthusiasm.
- Manages Overwhelm: Breaking down larger home painting goals into single-day room projects makes the overall task feel much less daunting.
Pro-Tip: For a one-day refresh, opt for quick-drying paints if available. Ensure good ventilation to speed up drying times between coats (if needed). Having a helper can make the process even faster and more fun!
Your Effortless Home Transformation Awaits
With these 13 wall painting hacks, achieving a home that wows is no longer about strenuous labor but about smart, strategic choices. From the instant drama of an accent wall to the subtle sophistication of a well-chosen sheen, you now have the tools to create maximum visual impact with surprisingly minimal effort.
So, pick a hack, choose your colors, and get ready to fall in love with your home all over again. Painting doesn’t have to be a chore; it can be a quick, rewarding path to a space that truly reflects your style and personality. Happy (effortless) painting!
Frequently Asked Questions
- Q: What’s the quickest way to choose a paint color that will definitely make an impact?A: For guaranteed impact with minimal agonizing, consider these:
- Dramatic Accent Wall: Go for a bold, rich color like deep teal, charcoal gray, or a warm terracotta on a single wall (Hack #1).
- Monochromatic Scheme with Variation: Choose a color you love and use different shades and tints of it throughout the room (e.g., medium blue walls, light blue ceiling, dark blue accents in decor). This is sophisticated and cohesive.
- Consult Color Trends (Wisely): Look at current “colors of the year” from major paint brands for inspiration, but always choose something you genuinely love and that complements your existing furnishings.
- Q: Can I really skip primer to save effort if my walls are already painted?A: Sometimes, yes, especially if you’re using a high-quality “paint and primer in one” (Hack #6) and the existing wall color is similar or lighter and in good condition (no stains, no peeling). However, always prime if:
- You’re making a dramatic color change (e.g., dark to light, or very light to very dark).
- There are stains (water, smoke, crayon).
- The previous paint was glossy (you’ll need a bonding primer).
- You’re painting new drywall or repaired patches. Skipping primer in these cases will mean more coats of your expensive topcoat, which is more effort and cost in the long run.
- Q: What’s the absolute minimum prep work I can get away with for a decent result?A: While thorough prep is always recommended, for a minimal effort approach on a wall in relatively good condition:
- Clean: At the very least, wipe down the walls with a damp cloth or a Swiffer to remove dust and cobwebs. For kitchens or bathrooms, a quick wash with a mild degreasing cleaner is essential.
- Tape: Quickly tape off trim, ceilings, and floors if you’re not confident cutting in.
- Cover: Throw a drop cloth over furniture and floors. Skipping cleaning means your paint might not adhere well. Skipping taping (if you can’t cut in neatly) means messy edges.
- Q: I’m not artistic. Which of these hacks is genuinely foolproof for adding visual interest?A: The Accent Wall (Hack #1) is nearly foolproof – pick a color, paint one wall. Painting the Inside of Bookshelves (Hack #5) is also very easy. The “Refresh Instead of Repaint” (Hack #9) focuses on cleaning and minor fixes. For adding a bit more flair, the Two-Tone/Half-Painted Wall (Hack #3) is quite manageable if you take your time with the painter’s tape and use a level.
- Q: How can I make a small room look bigger with paint using minimal effort?A:
- Light & Bright Colors: Opt for light, airy colors (whites, off-whites, pale blues, soft grays).
- Monochromatic Scheme: Painting walls, trim, and even the ceiling in similar light shades can blur the boundaries of the room, making it feel more expansive.
- Strategic Sheen: Use a satin or eggshell finish (Hack #12) to reflect light.
- Vertical Stripes (if you’re up for it): A subtle, single vertical stripe (Hack #8) or even just the perception of height from a lighter ceiling can help.
- Q: What’s one tool that will save me the most effort when painting?A: A good quality paint roller with an extension pole is a game-changer. It allows you to cover large wall areas quickly and comfortably without excessive bending or reaching, and reduces strain on your back and shoulders. Also, investing in a paint can opener and a pour spout can minimize messy spills and wasted paint, saving cleanup effort.
- Q: I want to try a bold color but I’m scared of commitment. What’s a low-effort way to experiment?A:
- Accent Wall (Hack #1): It’s just one wall. If you hate it, repainting one wall is far less effort than a whole room.
- Paint a Large Canvas: Buy a large, inexpensive art canvas and paint it your bold color. Prop it against the wall to see how you like the color in your space before committing to a wall.
- Inside of Bookshelves/Cabinets (Hack #5): A small, hidden pop of bold color.
- Use Peel-and-Stick Paint Samples: Many brands now offer these, allowing you to stick a large color swatch on your wall without actually painting.
- Q: How long should I wait between coats of paint if I’m trying to finish quickly?A: Always follow the manufacturer’s instructions on the paint can. Most latex paints require 2-4 hours between coats. Rushing this can lead to problems like peeling, bubbling, or uneven coverage, which means more effort to fix later. Ensure good ventilation to help with drying times. If you’re truly pressed for time, look for paints specifically labeled “quick-drying.”
- Q: What’s the easiest way to clean up after painting to minimize effort?A:
- Latex Paint: Clean brushes and rollers immediately with soap and water. Don’t let paint dry on them. Lining your paint tray with aluminum foil or a plastic bag means you can just discard the liner for super-fast tray cleanup.
- Protect Yourself & Surroundings: Wear old clothes. Use drop cloths extensively. Wipe up spills immediately while they are wet.
- Wrap Brushes/Rollers for Breaks: If taking a short break (a few hours or overnight for some paints), tightly wrap your loaded brush or roller in plastic wrap or a sealed plastic bag. This prevents the paint from drying, saving you from washing them prematurely.
Leave a Reply