How to Remove Paint Scuff From Car
Dealing with paint scuffs on your car can be frustrating. Whether it’s a result of a careless shopping cart, a minor fender bender, or just everyday wear and tear, paint scuffs can detract from your vehicle’s appearance. Fortunately, there are effective methods to remove these unsightly marks without damaging the underlying paint. In this article, we’ll explore how to remove paint scuffs from your car, step by step.
Understanding Paint Scuffs
Before diving into the removal process, it’s essential to understand what paint scuffs are and how they occur.
What Are Paint Scuffs?
Paint scuffs are superficial marks that occur when the paint surface of your vehicle comes into contact with another object. These marks can vary in severity and can be caused by:
- Contact with other vehicles: Bumping against another car or getting too close to a wall can leave scuffs.
- Shopping carts or bicycles: These common items can easily scratch the paint when they come into contact with your car.
- Road debris: Small rocks or gravel can cause minor scuffs when they hit your car during driving.
- Clear Coat Scuffs: These are surface-level scratches that only affect the clear coat layer of your car’s paint.
- Base Coat Scuffs: These penetrate deeper, affecting the base color of the paint.
- Primer Scuffs: These are the most severe, exposing the primer or metal underneath the paint.
- Microfiber cloths
- Car soap
- Water
- Buckets
- Polishing compound
- Rubbing compound
- Wax
- Scratch removal kit (optional)
- Clay bar (optional)
- Paint touch-up kit (if necessary)
- Mix: Combine baking soda with a small amount of water to form a paste.
- Apply: Gently rub the paste onto the scuff using a microfiber cloth.
- Rinse: After a few minutes, rinse off with water and dry.
- Choose a non-gel toothpaste: Use a whitening or abrasive toothpaste.
- Apply: Put a small amount on a cloth and rub the scuff gently.
- Rinse: Wipe with a damp cloth and dry.
- Mix: Combine equal parts vinegar and olive oil.
- Apply: Use a cloth to rub the mixture onto the scuff.
- Wipe off: After a few minutes, wipe clean with a damp cloth.
Types of Paint Scuffs
Tools and Materials Needed
Before starting the removal process, gather the following tools and materials:
Step-by-Step Guide to Remove Paint Scuffs
Step 1: Clean the Affected Area
Before attempting to remove the scuff, clean the affected area to ensure that dirt and debris do not scratch the paint further.
1. Wash the area: Use car soap and water to wash the area around the scuff. Rinse thoroughly.
2. Dry the area: Use a clean microfiber cloth to dry the surface completely.
Step 2: Assess the Damage
Determine the severity of the scuff. If it’s a clear coat scuff, it’s likely easier to remove than a base coat or primer scuff.
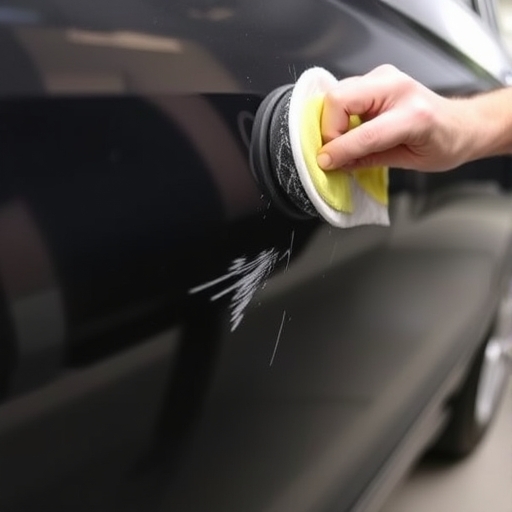
Step 3: Use a Polishing Compound
For clear coat scuffs, a polishing compound is often effective.
1. Apply the compound: Put a small amount of polishing compound on a clean microfiber cloth.
2. Buff the area: Gently rub the compound into the scuff using circular motions. Be careful not to apply too much pressure.
3. Wipe off excess: After buffing for a minute or two, use a clean section of the cloth to wipe away any excess compound.
Step 4: Use a Rubbing Compound (If Necessary)
If the scuff persists, a rubbing compound may be required.
1. Apply the rubbing compound: Similar to the polishing compound, apply a small amount to a clean cloth.
2. Buff the area: Use circular motions with slightly more pressure than you did with the polishing compound.
3. Check your progress: Periodically wipe away the compound to see if the scuff is fading.
4. Finish up: Once the scuff is gone, clean the area once more with a damp cloth and dry it.
Step 5: Wax the Area
After removing the scuff, it’s essential to protect the paint.
1. Apply wax: Use a quality car wax and apply it to the area where you removed the scuff.
2. Buff the wax: Allow the wax to dry according to the product instructions and then buff it off with a clean microfiber cloth.
Step 6: Touch Up Paint (If Needed)
For deeper scuffs that have affected the base coat, you may need to use touch-up paint.
1. Select the right color: Obtain a touch-up paint that matches your car’s color. Check the vehicle’s paint code if necessary.
2. Apply the paint: Use a fine brush to apply the paint carefully to the scuffed area.
3. Let it dry: Allow the paint to dry completely before applying any wax.
Alternative Methods for Paint Scuff Removal
If you prefer not to use commercial products, several household items can help remove paint scuffs.
Baking Soda Paste
Toothpaste
Vinegar and Olive Oil
Comparison of Scuff Removal Methods
| Method | Effectiveness | Ease of Use | Cost |
|---|---|---|---|
| Polishing Compound | High | Moderate | Moderate |
| Rubbing Compound | High | Moderate | Moderate |
| Baking Soda Paste | Moderate | Easy | Low |
| Toothpaste | Moderate | Easy | Low |
| Vinegar and Olive Oil | Low | Easy | Low |
| Touch-up Paint | High | Moderate | Moderate |
FAQs
How do I know if the scuff is just on the clear coat?
Gently run your fingernail over the scuff. If you can feel a groove, it may be a deeper scratch. If it feels smooth, it’s likely just on the clear coat.
Can I use a magic eraser to remove paint scuffs?
While magic erasers can be effective for some surfaces, they can be too abrasive for car paint. Use with caution, and test on an inconspicuous area first.
How often should I wax my car?
It’s recommended to wax your car every three months to protect the paint and maintain its shine.
What if the scuff doesn’t come off?
If the scuff is deep or if you’re unsure about the removal process, consider seeking professional help.
Conclusion
Removing paint scuffs from your car doesn’t have to be a daunting task. With the right tools and techniques, you can restore your vehicle’s appearance and protect its paint. Remember to always start with the least abrasive methods and work your way up if necessary. Regular maintenance, such as washing and waxing, can help minimize the occurrence of paint scuffs and keep your car looking its best. Happy cleaning!