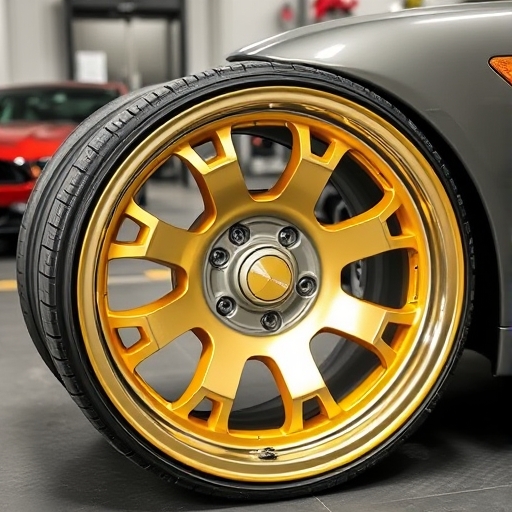
How to Paint Rims: A Comprehensive Guide
Painting your car rims can be a fantastic way to enhance its overall appearance, protect against corrosion, and even increase resale value. Whether you’re looking to refresh your vehicle’s look or want to personalize it, painting rims can be a rewarding DIY project. In this guide, we’ll cover everything you need to know about how to paint rims, from preparation to finishing touches.
Why Paint Your Rims?
Before diving into the process, let’s explore the benefits of painting your rims:
- Aesthetic Appeal: A fresh coat of paint can dramatically change the look of your vehicle.
- Customization: Painting allows you to express your personal style.
- Protection: Paint can act as a barrier against rust and corrosion.
- Cost-Effective: Painting is often cheaper than buying new rims.
- Jack and jack stands: To lift your vehicle safely.
- Lug wrench: To remove the wheel lug nuts.
- Sandpaper or sanding block: For surface preparation.
- Masking tape: To protect areas you don’t want to paint.
- Spray gun or spray cans: For applying paint.
- Clear coat spray: For added protection.
- Rim cleaner: To remove dirt and grease.
- Primer: To help the paint adhere better.
- Paint: Choose a high-quality automotive paint suitable for rims.
- Safety goggles and gloves: For protection during the process.
- Use a rim cleaner to thoroughly scrub the rims.
- Rinse with water and let them dry completely.
- Remove any old paint, rust, or debris using sandpaper.
- Use masking tape to cover any areas you do not want to paint, such as the tire sidewalls and brake components.
- Consider using newspaper or plastic sheets to cover larger areas.
- Sand the rims lightly to create a rough surface for the paint to adhere to.
- Start with a coarser grit (around 120-grit) and finish with a finer grit (around 220-grit).
- Wipe down the rims with a damp cloth to remove any dust or debris after sanding.
- Apply a thin layer of automotive primer to the rims.
- Hold the spray can or gun about 6-12 inches away from the surface.
- Allow the primer to dry according to the manufacturer’s instructions (usually about 30 minutes).
- Select a high-quality automotive paint designed for rims. Options include:
- Glossy: For a shiny finish.
- Matte: For a more subdued look.
- Metallic: For a sparkly effect.
- Once the final coat of paint is dry, apply a clear coat to protect the paint.
- Use the same technique as with the paint, applying thin, even coats.
- Allow the clear coat to dry completely.
- Allow the paint to cure for at least 24 hours before driving the vehicle.
- Regularly clean the rims with mild soap and water to maintain the finish.
- Choose the Right Environment: Paint in a well-ventilated area, preferably outdoors or in a garage with good airflow.
- Temperature Matters: Ideal painting temperatures are between 60°F and 80°F.
- Test the Paint: If using a new paint brand, test it on a small area or spare rim first.
- Patience is Key: Allow adequate drying time between coats to avoid runs or uneven texture.
- Skipping Preparation: Proper cleaning and sanding are crucial for paint adhesion.
- Rushing the Process: Take your time with each step to ensure the best results.
- Using Incompatible Products: Ensure that the primer and paint are compatible with each other.
Tools and Materials Needed
To successfully paint your rims, gather the following tools and materials:
Tools
Materials
Step-by-Step Guide to Painting Rims
Step 1: Preparation
1.1 Safety First
Before starting, ensure you have all your safety gear on. Wear gloves and goggles to protect your skin and eyes from chemicals and paint.
1.2 Remove the Wheels
1. Park on a flat surface: Ensure your vehicle is stable.
2. Loosen the lug nuts: Use the lug wrench to slightly loosen the lug nuts while the wheel is still on the ground.
3. Jack up the vehicle: Position the jack under the vehicle’s lift points and raise it until the wheel is off the ground.
4. Remove the wheel: Completely unscrew the lug nuts and take the wheel off.
1.3 Clean the Rims
Step 2: Masking
Step 3: Sanding
Step 4: Priming
Step 5: Painting
5.1 Choosing the Paint
5.2 Applying the Paint
1. Shake the spray can or mix the paint: Ensure it’s well-mixed for even application.
2. Apply the first coat: Start with light, even strokes, overlapping slightly with each pass.
3. Let it dry: Follow the manufacturer’s recommended drying time (usually about 30-60 minutes).
4. Apply additional coats: For the best coverage, apply 2-3 additional coats, allowing adequate drying time between coats.
Step 6: Clear Coating
Step 7: Reinstalling the Wheels
1. Carefully reinstall the wheels: Align the holes with the wheel studs.
2. Hand-tighten the lug nuts: Secure them before lowering the vehicle.
3. Lower the vehicle: Remove the jack stands and lower the vehicle back to the ground.
4. Tighten the lug nuts: Use the lug wrench to securely fasten the lug nuts in a criss-cross pattern to ensure even tightening.
Step 8: Curing and Maintenance
Comparison of Paint Types for Rims
| Paint Type | Finish | Durability | Cost |
|---|---|---|---|
| Glossy | Shiny | High | Moderate |
| Matte | Flat | Moderate | Moderate |
| Metallic | Sparkly | High | Higher |
| Powder Coat | Durable | Very High | High |
Tips for a Successful Rim Painting Job
Common Mistakes to Avoid
FAQ
How long does painted rims last?
Painted rims can last anywhere from 1 to 5 years depending on the quality of the paint, environmental conditions, and maintenance.
Can I paint my rims without removing them?
While it’s possible to paint rims without removing them, it’s highly discouraged. Removing the rims allows for better access and a more even finish.
What if I make a mistake while painting?
If you make a mistake, you can sand down the affected area and repaint. Make sure to follow the steps carefully for the best results.
Do I need a special type of paint for rims?
Yes, it’s best to use automotive paint that is specifically designed for rims, as it can withstand heat and road conditions better than standard paint.
Can I use spray paint from a hardware store?
While you can use spray paint, it’s recommended to use automotive-grade spray paint for durability and heat resistance.
Conclusion
Painting your rims can be a fun and rewarding project that enhances the look of your vehicle while providing protection against the elements. With the right tools, materials, and techniques, you can achieve a professional-looking finish. Remember to take your time, follow the steps carefully, and enjoy the transformation of your rims! Happy painting!