How to Use Touch Up Paint: A Comprehensive Guide
Touch up paint is an invaluable tool for maintaining the aesthetics of your vehicle, furniture, or home surfaces. Whether you’re dealing with minor scratches, chips, or imperfections, knowing how to effectively use touch up paint can save you time and money. In this guide, we’ll explore the various types of touch up paint, how to apply it correctly, and tips for achieving a flawless finish.
What is Touch Up Paint?
Touch up paint is a specially formulated paint designed for repairing small imperfections on various surfaces. It is available in a range of colors to match different finishes, making it ideal for minor repairs. Touch up paint can be used on vehicles, walls, and furniture, providing a cost-effective solution for maintaining appearance and value.
Types of Touch Up Paint
Automotive Touch Up Paint
Automotive touch up paint is designed specifically for vehicles and is available in two forms: aerosol spray cans and small bottles with brushes. It is formulated to match the exact color of your vehicle and is often available through dealerships or automotive supply stores.
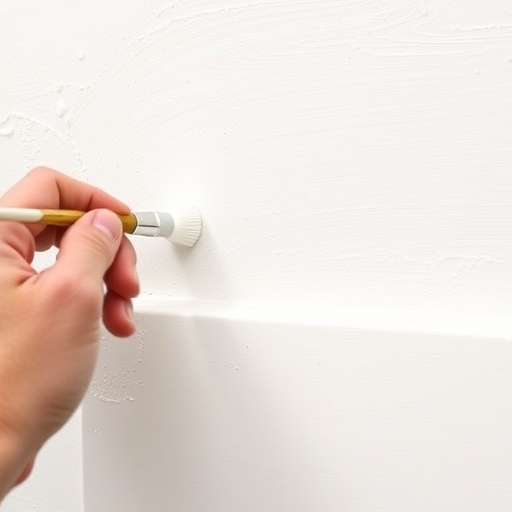
Household Touch Up Paint
Household touch up paint is typically used for walls and ceilings. It can come in small containers or touch-up pens, making it easy to apply to small areas. Many manufacturers offer touch up paint that matches their wall paint colors.
Furniture Touch Up Paint
Furniture touch up paint is designed for wood, laminate, or other furniture surfaces. It often comes in a pen or small bottle and is available in various finishes, including gloss, satin, and matte. This type of paint is perfect for covering scratches and dents on furniture pieces.
Preparing for Touch Up Painting
Gathering Supplies
Before you begin the touch-up process, gather the necessary supplies:
-
- Touch up paint (specific to the surface)
- Clean cloth or paper towels
- Sandpaper (fine grit)
- Primer (if necessary)
- Paintbrush or applicator (for small areas)
- Masking tape (for larger areas)
- Clear coat (optional, for added protection)
Cleaning the Surface
Proper surface preparation is crucial for a successful touch-up job. Follow these steps:
1. Clean the Area: Use a clean cloth or paper towel to remove any dirt, grease, or debris from the surface.
2. Dry the Surface: Ensure the area is completely dry before applying touch up paint to prevent moisture from interfering with adhesion.
Assessing the Damage
Take a moment to evaluate the extent of the damage. This will help you determine if you need to use primer or if touch up paint alone is sufficient:
-
- Minor Scratches: Can usually be repaired with touch up paint alone.
- Chips or Dents: May require sanding and primer before applying touch up paint.
- Larger Areas: Consider whether a full repaint is more appropriate than touch up work.
Applying Touch Up Paint
Step-by-Step Instructions
1. Prepare the Area: Use masking tape to protect areas surrounding the damage, ensuring a clean edge.
2. Sand the Damaged Area: Lightly sand the area around the scratch or chip to create a smooth surface for adhesion. Wipe away dust with a clean cloth.
3. Apply Primer (if necessary): If the damage is deep, apply a thin layer of primer and allow it to dry according to the manufacturer’s instructions.
4. Shake the Touch Up Paint: If using a bottle, shake well to mix the paint thoroughly.
5. Apply the Touch Up Paint:
-
- For small areas: Use a fine brush or applicator to apply the paint directly to the damaged area.
- For larger areas: Use a spray can for an even coat, keeping the can about 6-10 inches away from the surface.
6. Allow to Dry: Follow the manufacturer’s instructions for drying time. Avoid touching the area until it’s fully cured.
7. Apply Clear Coat (optional): For added protection and shine, apply a clear coat over the touch-up paint once it’s dry.
Techniques for Different Surfaces
Automotive Touch Up
-
- Use a fine brush: For small scratches, a fine brush allows for precise application.
- Layering: Apply multiple thin layers instead of one thick layer to avoid drips.
Household Touch Up
-
- Paint pens: Ideal for small touch-ups on walls. Simply draw over the imperfection.
- Rollers: For larger areas, use a small roller to achieve a uniform finish.
Furniture Touch Up
-
- Color matching: Ensure the touch up paint matches the existing finish. Test in an inconspicuous area first.
- Blending: Feather the edges of the touch-up area to blend it with the surrounding surface.
Finishing Touches
Once the touch up paint has dried, inspect the area for any imperfections. If necessary, lightly sand the area with fine-grit sandpaper and apply an additional coat of paint. After you are satisfied with the result, remove any masking tape carefully to avoid pulling off the paint.
Common Mistakes to Avoid
- Skipping Surface Preparation: Failing to clean and sand the surface can lead to poor adhesion and an uneven finish.
- Using the Wrong Color: Always match the paint to the original color. Test on a small area if unsure.
- Applying Too Much Paint: Thick applications can lead to runs and an unsightly finish. Use thin layers instead.
- Not Allowing Enough Drying Time: Rushing the process can result in smudges or fingerprints on the finish.
Frequently Asked Questions (FAQ)
How do I find the right touch up paint color for my car?
Most vehicles have a paint code located on a sticker inside the driver’s door or under the hood. You can use this code to find the exact match at an automotive supply store or dealer.
Can I use touch up paint on any surface?
Touch up paint is designed for specific surfaces, such as automotive paint, wall paint, or furniture finishes. Always choose a product suitable for the material you’re repairing.
How long does touch up paint take to dry?
Drying times vary by product, but most touch up paints will be dry to the touch within a few hours. However, full curing may take several days. Refer to the manufacturer’s instructions for specific drying times.
Is it necessary to apply a clear coat after touch up painting?
While it’s not always necessary, applying a clear coat can provide additional protection against scratches and UV damage, especially for automotive touch ups.
What should I do if the touch up paint doesn’t match perfectly?
If the color doesn’t match, you may need to re-evaluate the paint code or try a different brand. In some cases, blending the edges of the touch up area can help minimize the appearance of mismatched paint.
Conclusion
Using touch up paint can be an easy and effective way to restore the look of your vehicle, furniture, or home surfaces. By following the steps outlined in this guide and avoiding common pitfalls, you can achieve professional-looking results even on minor repairs. Remember to take your time, choose the right products, and prepare your surfaces correctly for the best outcome. Happy painting!