How to Fix Paint Chips on Your Car
Paint chips on your car can be unsightly and may lead to more extensive damage if not addressed promptly. Whether caused by road debris, weather conditions, or accidental scratches, fixing paint chips is an essential part of car maintenance that can help preserve your vehicle’s appearance and value. In this guide, we’ll explore various methods for repairing paint chips, the materials you need, and tips for achieving a professional finish.
Understanding Paint Chips
Before diving into the repair process, it’s important to understand what paint chips are and why they occur.
What Are Paint Chips?
- Definition: Paint chips are small areas of missing paint on a car’s surface. They can expose the underlying metal, leading to rust and corrosion if left untreated.
- Common Causes:
- Road debris (stones, gravel)
- Weather exposure (UV rays, rain)
- Accidental scratches (shopping carts, keys)
- Chemical exposure (bird droppings, tree sap)
- Prevent Rust: Leaving paint chips untreated can lead to rust and corrosion, which can compromise the integrity of your vehicle.
- Maintain Aesthetic Appeal: A well-maintained paint job enhances your car’s appearance and resale value.
- Protect Against Further Damage: Addressing paint chips early can prevent more extensive damage that may require costly repairs.
- Wash the Car: Start by washing the area around the paint chip with soap and water. This removes dirt and grime.
- Dry Thoroughly: Use a clean cloth to dry the area completely.
- Inspect for Rust: Check for any signs of rust around the chip. If rust is present, it needs to be treated before proceeding.
- Sand the Area: Using fine-grit sandpaper, gently sand the area around the chip. This helps the paint adhere better.
- Clean Again: Wipe the area with a clean cloth to remove any dust from sanding.
- Choose the Right Color: Use touch-up paint that matches your car’s color. You can find the color code on the inside of the driver’s door or in the owner’s manual.
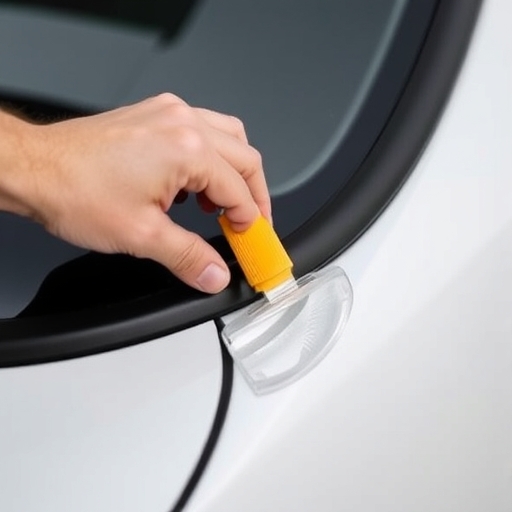
- Apply the Paint:
- Use a small brush or applicator to apply a thin layer of touch-up paint directly into the chip.
- Be careful not to overflow onto surrounding areas.
- Allow the first coat to dry completely (check the instructions on the paint for drying times).
- Layering: Depending on the depth of the chip, you may need to apply multiple layers of paint.
- Drying Time: Allow each layer to dry before applying the next. Follow the manufacturer’s recommendations for drying times.
- Optional Step: If desired, apply a clear coat over the touch-up paint. This enhances shine and provides additional protection.
- Application: Use the same method as with the touch-up paint, applying a thin layer and allowing it to dry completely.
- Sand Lightly: Once the paint is dry, lightly sand the area with fine-grit sandpaper to smooth out any unevenness.
- Polish the Area: Use a rubbing compound to polish the repaired area, blending it with the surrounding paint.
- Final Touch: Apply a coat of wax over the repaired area to protect the paint and enhance shine.
- Work in a Controlled Environment: Choose a dry, dust-free environment for repairs to avoid contaminants.
- Be Patient: Take your time with each step to ensure a flawless finish.
- Test on a Small Area: If you’re unsure about the color match, test the touch-up paint on a small, inconspicuous area first.
- Skipping Cleaning: Not cleaning the area can lead to poor adhesion and a subpar finish.
- Over-applying Paint: Using too much paint can create drips and an uneven surface.
- Neglecting Drying Times: Rushing the process can result in smudges or peeling paint.
The Importance of Repairing Paint Chips
Materials Needed for Repairing Paint Chips
Before starting the repair, gather the following materials:
Essential Tools and Supplies
| Item | Purpose |
|---|---|
| Touch-up paint | To fill in the chip and match the color |
| Clear coat (optional) | To provide a protective finish |
| Paintbrush or applicator | For precise application |
| Sandpaper (fine grit) | To smooth the area around the chip |
| Rubbing compound | To polish the repaired area |
| Wax | To protect the finished repair |
| Clean cloth | For cleaning the area before repair |
| Masking tape | To protect surrounding areas |
Step-by-Step Guide to Fixing Paint Chips
Step 1: Clean the Affected Area
Step 2: Prepare the Surface
Step 3: Apply Touch-Up Paint
Step 4: Add Additional Coats
Step 5: Apply Clear Coat (Optional)
Step 6: Smooth the Repair
Step 7: Wax the Car
Tips for a Successful Repair
Common Mistakes to Avoid
Frequently Asked Questions (FAQ)
How do I find the right touch-up paint for my car?
Most vehicles have a color code that can be found on a sticker inside the driver’s side door or in the owner’s manual. You can also contact your dealership or look online for your car’s color specifications.
Can I use regular paint for touch-ups?
It’s not recommended. Regular paint may not adhere correctly and can lead to mismatched colors. Always use touch-up paint specifically designed for automotive use.
How long will the repair last?
If done properly, a paint chip repair can last for several years. Regular maintenance, such as washing and waxing, can help prolong the repair.
What if the paint chip is deep?
For deeper chips, you may need to consider professional help, especially if rust is present. Professional repair services can provide more extensive solutions.
Conclusion
Fixing paint chips on your car doesn’t have to be a daunting task. With the right materials, tools, and patience, you can restore your vehicle’s appearance and protect it from further damage. By following the steps outlined in this guide, you can achieve a professional-looking repair and maintain your car’s value for years to come. Remember, addressing paint chips promptly is key to preventing more significant issues down the road. Happy repairing!